MyFitnessPal and OCR
This new project is the goal of coding up a python script to extract text from images. The images I want to extract are from is data from the MyFitnessPal app. If your familiar with the app you know that if you want to extract your data from the app to something like an csv file. Then you must pay extra money to do so. So, I thought this will be an interesting project to do.
So, when googling around I found a popular OCR python library used for extracting text from images. PyTesseract, the name in which the library is called. Is a python wrapper based on Google's Tesseract-OCR Engine. Which is a trained neural network which reads the text given to it. The python script will also be use the Pillow library to allow for the handing of image files in the program.
So first I made a new environment called OCR. To handle all of the packages involved in this project.

After that, I installed the needed packages for the project. Pillow and PyTesseract.


After then I noticed that I needed to install the Tesseract engine itself to my machine. Reading the introductions on the library’s wiki it suggested we should a install a windows installer from here.
After the installation I was set up. Using the code from this article. I made a simple function which should test the programs reading ability.
When I was trying to run the program, it gave me this error

When finished I added the tesseract OCR folder to windows PATH. But that still did not work. I found the solution was to create a variable called pytesseract.pytesseract.tesseract_cmd which will of the full path of the exe file. I noticed the exe file only appeared later on when I clicked some of the files. I don’t know why it did so, but it helped fix my issue.
Now after I ran the program after resolving the issues. It printed out this result

The example image used looked like this

A simple type up I made on Microsoft WordPad. So, it is fair to say that the experiment went well.
Now MyFitnessPal screenshots are from the android app. Because my phone allows for scrolling screenshots, I opted for that instead of multiple mini images.

As we can see the image is a wee bit long. But zooming in we can see the induvial values.

Looking at the screenshot at hand I think I will need to do a few crops. So the tesseract program does not confuse any images or symbols with text. I need to crop the top sections which contains the charts. Also, the right hand section of the values. As that were the images show. If there are not images on the value the app will show a symbol instead as we can see above.

I using paint 3d to crop the screenshot. The result now

As we can see this is plainer and less likely to cause hiccups in the OCR program.
Now running the program under this screenshot we get this result.

As we can see the program as able to understand the screenshot’s text almost perfectly. Now we want a way to export this. From looking at the manual of tesseract it allows for multiple output files. Mainly alto, hocr, pdf, tsv, txt. But I quickly found out that I only export pdf or hocr. Because the library I’m using to access the tesseract program, pytesseract allows exporting out data like boxes, page numbers etc. But not a clean export file like txt. So, I will have to code up the print statements of image_to_string function to an text file for further conversion. Mainly to an csv or tsv file for so it can be graphed and opened on any spreadsheet program like google sheets or excel.
Using this code from Quora I was able to find a solution. Which wrote down the values into a text file.

Now, converting the text file into a list is done so we can later convert it into a pandas dataframe. Using this line of code extracted the values in the file.
lineList = [line.strip('\n') for line in open('output.txt')]The list compression makes a new list by opening the output.txt file and extracting the lines in the file. The lines are also striped of to newline character as these are not needed.
When I printed the result, I noticed that the list kept empty strings.

So I had to make another list compression to remove the empty strings.
lineList = [x for x in lineList if x != '']After that needed a way to separate the values into there own rows. To do this I had to use list slicing. Something similar I used in my previous project.
res = [lineList[x:x+2] for x in range(0, len(lineList),2)]
Now the list is fully sorted. As each individual list is paired with their date and weight number.
The next step is convert into pandas. Which is not to hard as we did the work to sort out the data.
We want to make columns, so we make a list contains the names of them:
columns = ['Date', 'Weight']After that we can turn the list into a data frame and use the columns variable containing the names to set up the column of the dataframe.
df = pd.DataFrame(res, columns=columns)Which results in this:

We can say this is complete, I later noticed that the kg characters that are attached to the end of the strings. This will make it difficult for programs to analyse the data as is not numeric data.
So, choose to delete the “kg” characters. We can use the str.replace function.
df['Weight'] = df['Weight'].str.replace(r'kg', '')This code replaces the “kg” characters with an empty string in the Weight column.

Now final stage is to export the dataframe. This is simple, one line of code is needed:
df.to_csv('Weight_over_time.csv', index=False, encoding='utf-8')The df.to_csv is the function to export the dataframe to csv file.

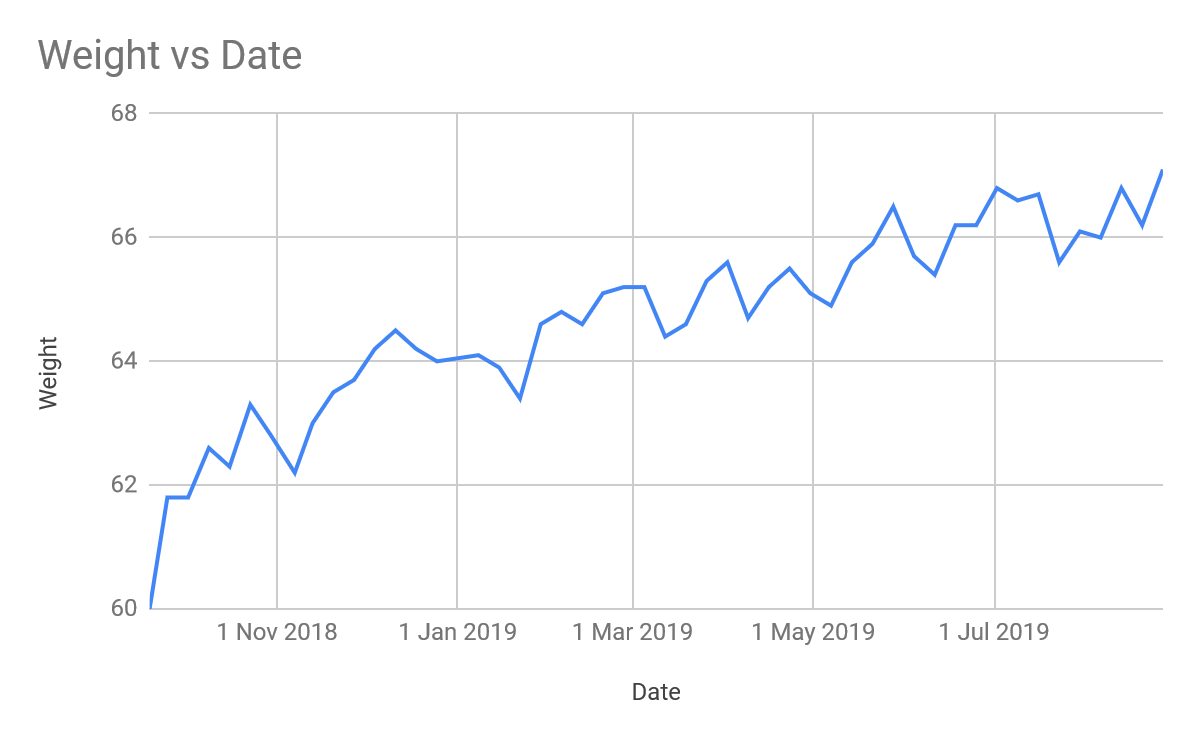
This is how the csv looks in google sheets

As we can see the csv file formats very into the spreadsheet program.
This is graphing the data using the charts of google sheets.
Now you know how convert screenshots from your phone to useful data using python.
Evernote scraper 7
Continuing from the previous article.
if re.search('---', values) or re.search('pra', values) or re.search('forgot', values):
            lifts_writer.writerow(values_to_row)
            print(values_to_row)
            values_to_row.clear()

if re.search('Tick', values):
    lifts_writer.writerow(values_to_row)
    print(values_to_row)
    values_to_row.clear()
These if statements capture the out of order value and keep the loop of stopping.

Now we have all the data we just need to put the values in the right order again. This is because few of the values are in the wrong order.
The value where it talks about the tick system is a note. So it must be moved to the note column to the end. To do this simply create a simple for loop to inserst more none values into the columns. So the value will shift to the end.
for column in range(6):
          values_to_row.insert(0, None)
The value was pretty easy to sort out, but the problem now is mainly sort out the lifts so they are in the right column.
I tried sorting one lift out using this code:
if regex_bench.search(values_to_row[2]):
                 values_to_row.insert(2, 'TEST')
                 values_to_row.insert(3, 'TEST')
But the problem is the position of the bench values changes so will not be correct all the time.
for line in values_to_row:
                if regex_bench.search(line):
                    print('POSTION OF VALUE:')
                    IndexValue = values_to_row.index(line)
                    print(values_to_row.index(line))
                    values_to_row.insert(IndexValue + 1 'TEST')
                    values_to_row.insert(IndexValue - 1, 'TEST')
So I tried this solution which will make it more generalised as the position is based on the index of the value. This did not place the value in the correct places but with a minor change to the insert function It was able to work
values_to_row.insert(IndexValue, 'TEST')
                    values_to_row.insert(IndexValue + 1, 'TEST')
So next step was to do the other lifts.
elif regex_deadlift.search(line):
                print('POSTION OF VALUE:')
                IndexValue = values_to_row.index(line)
                print(values_to_row.index(line))
                values_to_row.insert(IndexValue - 1, 'TEST')
                break
Was code for the deadlift. But even though some of the values were in the correct order. I notice this way of coding the solution to sort out the values will not work. As new values will be inserted into the row to previous position will be undone. As the values will be shifted again.
Trying to replace the values_to_row.append(values) in the if statements did not work. First try simply did not do anything. Secord time tried to make a loop which would shift values if the it did not match the regex.
elif regex_press.search(values):
                # try:
                #     for value in values_to_row:
                #         if value != regex_press.search(values):
                #             values_to_row.insert(2, 'TEST')
                # except IndexError as error:
                #     print(error)
                #     continue
The problem is that it got stuck in the loop so it did not move on to sort out the next values in the list. So I went to move back to the if len(values_to_row) > 3 if statement to add to the sorting code.
I was able to write some fairly successful code to sort out the bench values.
if regex_bench.search(values_to_row[2]):
                values_to_row.insert(4, values_to_row[2])
                values_to_row.pop(2)
                values_to_row.insert(2, 'TEST')
This if statement checks the bench value via regex then moves the bench to the 4th index position in the list. The next line removes the old bench value and position though the pop function. The next line adds a test sting as I placeholder. Original I wanted it to simply be a nonetype but the functions don’t work correctly when dealing with nonetypes, also when checking the csv file to make sure the changes are correct the ‘TEST’ string makes it more clearer to spot rather that a single comma.

Below this is the csv file imported to google sheets. As we can see the there is some structure. The main issues that come apparent is that information of the lifts need to added to the list column. Also stilling trying to fix this lone deadlift value. The value is part of the October 4th but as the ifs statements allows 4 values per row it removes the deadlift value. To be honest I may just manual place the value on the correct row instead of spending time coding up a solution which I’m already doing. Especially that this pattern only happen handful of times in the in the file.

Able to get some progress down to split the extra content of the lifts to notes column.
if regex_squat.search(values_to_row[1]) and not (regex_ticks.search(values_to_row[1])):
                if len(values_to_row[1]) > 10:
                    values_to_row.insert(6, values_to_row[1][10:])
This code checks the if the first value of the row is a squat via regex. The and statement checks if the values does not have any tick emojis. After those criteria are met the next if statement checks that the value is greater than 10 characters if so the string will be sliced by 10th characters to the last remaining character then inserted to the notes column.
The problem now is that the notes value are not inserting probably. Some values are being inserted into the power clean column. Ive been playing around with the index in the insert function to solve the issue but I have not found it.
After dealing with the code of above I decided to get rid of the 10: slice of the string. As I found that slicing the string into the notes section removed the context of the comment. So when reading you don’t not what lift the note is referring to.
Also to fix the issue of the values not inserting into the right colum I added more placeholder values so the value ends up in the correct place. The issue previously is that the value was placed as the last item in the row regardless of the index chosen. So if the row ends before the chosen index it will not placed correctly.
Have made more dupilates to extracts the lifts notes to the right column.
if regex_deadlift.search(values_to_row[3]) and not (regex_ticks.search(values_to_row[3])):
                if len(values_to_row[3]) > 13:
                    values_to_row.insert(7, values_to_row[3])
                else:
                    pass

try:
                if regex_bench.search(values_to_row[4]) and not (regex_ticks.search(values_to_row[4])):
                    if len(values_to_row[4]) > 10:
                        values_to_row.insert(7, values_to_row[4])
                    else:
                        pass
            except IndexError:
                pass
The second if statement is under a try/expect block, because the program stops under an index error as the bench value will not be under every row. The block allows the program to move on if it does not have a value to check.
The main issue now is trying to allows notes that ticks on them. As the if statements prevent that. And allowing notes on dates.
When checking the csv file they are exceptions were on some days did not have the correct lift order. Like below

This was fixed by extra if statements by inserting more placeholder statements
if values_to_row[0] == 'September 27:':
                values_to_row.insert(4, 'TEST')

            if values_to_row[0] == '21 April':
                values_to_row.insert(3, values_to_row[2])
                values_to_row.pop(2)
                values_to_row.insert(2, 'TEST')
                values_to_row.insert(4, values_to_row[3])
                values_to_row.pop(3)
                values_to_row.insert(3, 'TEST')
The solution I’ve found to extract notes while values of the tick character is to attach .replace function next to the value called in the list.
if regex_squat.search(values_to_row[1]):
                if len(values_to_row[1].replace('✔️', '')) > 14:
                    values_to_row.insert(7, values_to_row[1])
                else:
                    pass
The replace function takes a away the ticks. While the len function can count the string without counting the tick emojis. This works as now all stings can be taken in regardless if they have ticks or not.
After that created a new python file to clean up the csv file. I didcied to opted to use the pandas library as it easier to deal with the indivual columns compared to the built-in csv library which deals with rows only.
I used the pandas str replace function to replace most of the unwanted charcters. Using the this list for unwanted items
regexfilter = ['[a-zA-Z]', '✔️', '❌', '➡️', '😕', ':', '\(.*\)', '✖️', '/']The first item selects all non-numeric characters. The next charcaters are emojis. The next ones the slash character.
df['Squat'] = df['Squat'].str.replace(r'|'.join(regexfilter), '')
df['Press'] = df['Press'].str.replace(r'|'.join(regexfilter), '')
df['Deadlift'] = df['Deadlift'].str.replace(r'|'.join(regexfilter), '')
df['Bench'] = df['Bench'].str.replace(r'|'.join(regexfilter), '')
df['Power clean'] = df['Power clean'].str.replace(r'|'.join(regexfilter), '')
The next replacements are getting rid of the parentthises. This had to be done as the syntax does not allow you to select the parentheses characters normally as they count as regex special charcters.
This regex pattern selects the parentheses
df['Squat'] = df['Squat'].str.replace(r"\(.*\)", "")After that the final function is to use str.strip () which does the same job as the python strip(). So we can get rid of whitespaces.
df['Squat'] = df['Squat'].str.strip()Now this make the csv file easier to import into excel or google sheets

Custom edits will still have to be made though.
While edit I found a major error that few of lifts were in the wrong columns. Mainly few deadlifts where in the overhead press column.
While trying to find the solution for to move the correct column using the pandas library decided I’ve been spending to much time with this problem and I want to move on.
To manually the issue I when on google sheets and search on values that do not contain the characters for press. So I ended up with this set ^((?!pr|Pr).)*$
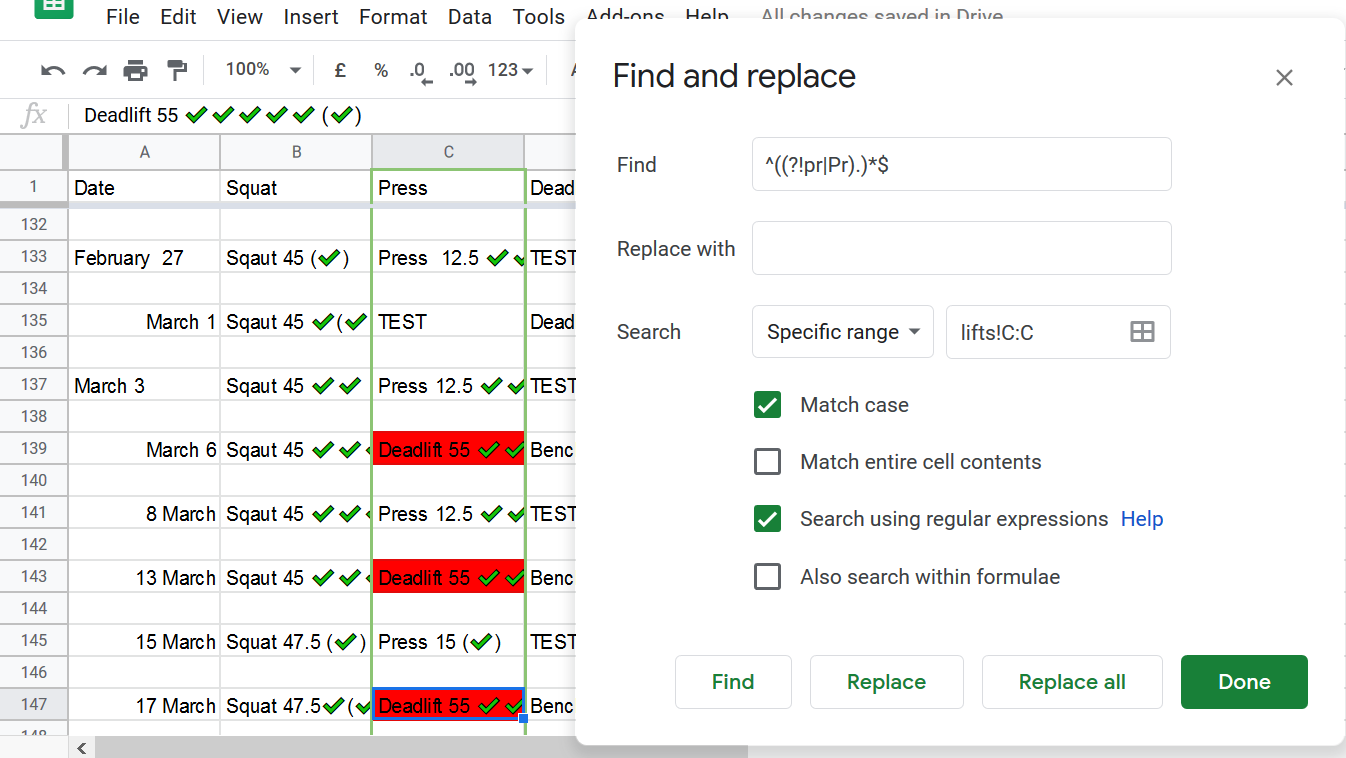
After I found them I highlighted them red so I can come bad to those rows to edit them.
Evernote scraper 6
Some minor changes I’ve made was adding extra conditional with the if statement
if len(values_to_row) > 3 and regex_dates.search(values_to_row[0]):
            lifts_writer.writerow(values_to_row)
            print(values_to_row)
            values_to_row.clear()
        else:
Now the if statement reads the list if its over 3 values and also checks to see if the first value in the row/list is a date. This what the csv file looks below.
As we can we captured most the beginning days in the list. It stops as the next value not a date. So the next stage now is to develop the else or elif statement to deal with values that are not dates. And write them into a row in correct order.
Right now I’ve found a less than optional solution was to do a regex find on the value which is stopping the loop.
if re.search('---', values):
            lifts_writer.writerow(values_to_row)
            print(values_to_row)
            values_to_row.clear()
Even though this does not place the value in the previous row it allows the loop to continue. Added an or conditional to allow for more values to be added into the loop
if re.search('---', values) or re.search('pra', values):
            lifts_writer.writerow(values_to_row)
            print(values_to_row)
values_to_row.clear()Evernote scraper 5
The main focus is to turn the data from the list to the csv. Using the csv writer to make the csv file of the files. My first idea is to create a short list which will store the values day. To be then used to write the row with the csv file. Then clearing the list for the next batch of data for the next row. When I wrote up the code to do use there was an issue where only one value counted in the row.

This is the code typed up
lifts_writer.writerow(values_to_row)
        print(values_to_row)
        values_to_row.clear()
This piece of code lies below the elif statements and the list is defined outside of the loop.
An improvement I found is that I can added a another if statement to stated the value_to_row list has more than three items before writing to csv and clearing.
if len(values_to_row) > 3:
            lifts_writer.writerow(values_to_row)
            values_to_row.clear()
As row will likely have around 3-4 items, mainly date and three other lifts.

Another error popped up, were writing the csv file the commard line returned this: UnicodeEncodeError: 'charmap' codec can't encode character '\U0001f613' in position 81: character maps to <undefined>
In the beginning I was very stumbled, as I tried solutions like converting the sting code into the character and creating more if statements. But luckily the solution is more simple. When creating the csv writer I forget to put the enoding option in the open statement. So I simply added it,
with open('lifts.csv', mode='w', encoding='utf-8') as lifts_file:
Then problem was solved.
The next problem is a duplicate of a previous problem. Some of the values did not start with the data first making the following values incorrect because of the wrong orders.

Make makes this problem slightly different is that slicing the list is a bit harder. And making nested list via that method will make writing the csv file more difficult. The writing of the rows is done by count the amount of items in the list, which is a bit different via slicing the list.
Evernote Scraper 4
Still working on the Evernote scraper. Recently I haven’t been working on it as much so the article will likely be very short. A simple tweak I did to the code was to print a new newline just before it printed a date value. This made the output of the loop much clearer and easier to read.

The main goal now is to turn this output into CSV file straight from the loop. I probably need to turn the values from the loop into variables. As these values in this printed form are only in the loop.
Trying to do this is turning to be very difficult because when appending the values to a new list, the previous issues occurred like values appearing as lists or values in the wrong order. If I make a new list it will need to have the values in the right order. With either two types of designs. A nested list where the values of the lift stored with an individual day. Or a flat list which the values stored in the correct order on after the other.
When appending some of these values to a new list I noticed that the list contain a few duplicate dates.

I think the reason is that the regex matches the “pr” character. The regex for pr was used for the press values. But the regex also captures the month of April. So I trying to develop an exception to the characters of April. They are mainly to main way could do so. The first is using a look around a pattern or using a negated set.
Using the negated set seems to return some results.

But when testing it out in the python program it does not make a difference. But I quickly found the solution I was tweaking the regex pattern. As I was using the individual regex pattern rather than the master regex pattern.

So now we need to start designing how the CSV writer should function. Probably need to use a few if statements to regex to sort the values out to the different columns. Made a quick list for the header or first row.
header = ["Date", "Squat", "Press", "Deadlift"", Bench", "Power clean", "notes"]Then added this for the CSV writer lifts_writer.writerow(header).
Which should create the first row.
As the CSV writer writes in rows, not columns. I will need to find a way I could write all values all in one row. To do this I will probably need to zip the values or turn to mini lists. Within the CSV open I'm using a loop and if statements.
values_to_row = []
    for values in value_to_list:
        if regex_dates.search(values):
                values_to_row.append(values)
The loop is to cycle through values in the list and the if statements to append to the temporary list used to write rows into the CSV file. The current issue is that values will need to be cleared out for every individual day.
Evernote scraping 3
After extracting the contents into multiple lists. The next is to extract each individual list content containing the lift data for the day. To do this, I’ve created loop to iterate each of the individual list and a nested loop to iterated through the values of the individual lists.
for lists in threelist2:
    for value in lists:
Now within the nested loop I added a few if statements to sort if the given value is a lift or a date. Using the regex variables from earlier.
if regex_dates.search(value):
            print(f"{value}, Date")

if regex_squat.search(value):
            print(f"{value}, lift")
I used the print statements before turning to an csv file, so find any problems seeing statements in my command prompt. The f stings help making the statements printed out clearer. The value variable is simply the individual item in the individual list. By printing the variable in the f-string it prints out the single item from the list. Using the regex statements from earlier it prints a lift or date tag alongside the value.

I decided to print the values like this because, it allows me to see how the program categorised the values, for example if I see a lift value attached to a date tag I know there is a problem so I need to check it out.
As I was running the program I found out that, there are a few values that are not under the lift or data category. So they would be labelled incorrectly. So new if statement was added to label some values as ‘non-lift’ which is separate from lifts or date.
A problem I had to deal with nested lists. As values shifted to previous lifts turn into lists rather than staying as strings. As mentioned in the previous article. To solution I found is to use the isinstance function to sort out functions from lists. The isinstance checks if an item is a certain type of object. In my case list. Under the isinstance using the master regex which contains all of the lift patterns in a single form. It will filter out values which are lift or non-lift values.
if isinstance(value, list):
   print(f"{value[0]}, nested-list")

            if master_regex.search(value[0]):
                print(f'{value[0]}, lift')
                pass
            else:
                print(f'{value[0]}, non-lift')

            continue
The value[0] is to access the single item in the nested list. As just printing value will just print the nested list itself. Also will stop the regex from working correctly as it takes strings as input.
This is a continuation of the Evernote scraper.
Now the main goals for this stage turning the elements from the div tag into a useable list, so it can be turned into useful data format later on. With the for loop which iterates over div tags content. Using this loop to save the contents in a list. When I was trying to develop a loop which would remove HTML items from the list I noticed that items in the were BeautifulSoup objects.

So made a new loop which iterated over the list a turned the items into string objects. The items which were turned into strings are sent into a new list.
sibling_contents_string = []
    for item in sibling_contents:
        item = str(item)
        sibling_contents_string.append(item)
Now I just need to get rid of the </br> items by matching the stings in an if else statement. But trying use the simple if else statement it did not work.
for item in sibling_contents_string:
    if item == '</br>' or '<br/>':
        sibling_contents_string.remove(item)
But I was able to make other if else using regex. Using this pattern: <.br>|<br.> this was able to purge all of the html tags. Using list compression which reduce the need for more lines:
regex = re.compile(r'<.br>|<br.>')
somelist = [item for item in sibling_contents_string if not regex.match(item)]
After I need to work out how to get rid of the first few elements of the list. As they are not needed data for the project. I will simply slice the list. I found that by slicing the by [8:] I was able to get rid of the non-needed elements. Now this sliced list can be stored in another variable as it can be used later.
Now I need to filter out the items into the dates and lifts. I will be utilising the regex again. Using the search function on the command prompt I looked at the values to see if any exception that needs to look out for. So when I develop the regex pattern it will be accounted for.
I developed variables to store the regex patterns of the different values:
regex_dates = re.compile(r'(Jan(uary)?|Feb(ruary)?|Mar(ch)?|Apr(il)?|May|Jun(e)?|Jul(y)?|Aug(ust)?|Sep(tember)?|Oct(ober)?|Nov(ember)?|Dec(ember)?)')
regex_squat = re.compile(r'(Sq).*|(sq).*')
regex_press = re.compile(r'.*(Pr).*|.*(pr).*')
regex_deadlift = re.compile(r'.*(d?ead).*')
regex_bench = re.compile(r'.*(B?ench).*')
regex_power_clean = re.compile(r'.*(P?ower).*')
regex_other_html = re.compile(r'<[^>]*>')
Now the next stage is to use to regex to filter the values into different columns of a csv file. Eailer I made a rough draft(in a text file) of how I would like the file to look like.

First using the regex patterns I was able to extract the values into different lists. Using list compression:
Dateslist = [date for date in sibling_contents_clean if regex_dates.match(date)]Printing the newly made dateslist variable gave me this:

So the list compression did a good job extracting the values. So did this for all the values I want to turn into columns. After making the lists I noticed that many of the values in the lifts had notes. So decided I wanted to copy them into a separate list so I can use it for a new notes section of the csv file.
I opted to keep stings that are over 25 characters as most normal items where around 15-20 and comments are more than 25 characters. Using the len function I was able to return items with more than 25 characters:

In plain text to make it more clear:

It was able to extract all of the notes but I noticed it also extracted items which did not have any notes. The issue is that some of the items had lots of emojis which made the value have more than 25 characters. The fix I found is to do another regex match to exclude it from the new list. Using this regex pattern to find an item that had ticks: re.compile(r'.*(✔️)') I saved it in a variable and used it in the loop.
Notes_squat_list = []
for squat in list_squat:
    if len(squat) > 25:
        if not regex_ticks.match(squat):
            Notes_squat_list.append(squat)
Items that have crosses are added straight to the lists regardless if they have ticks or not. Then items that don’t have crosses but have ticks are excluded from added to the lists. Because of the new if statement the list compression does not work anymore. As if statements in list compressions work as nested if statements, not if statements on the same level.
After getting the list ready I noticed a major issue when stitching them up. When I used the zip function to merge the dates and squat list, it worked perfectly well. The issue came when adding the other lists.
As you can see here the values aligned correctly with the correct dates. But the other values are attached to the wrong dates. This is because the lifts alternate on different days. Compared to squats which do not change.
So I opted for a more simple solution which would take every 4th value in the list. This done as the format goes like:
September 15
Squat 29kg
Press 5kg
Power clean 10kg
threelist = [sibling_contents_clean[i:i+4] for i in range(0,
             len(sibling_contents_clean), 4)]
Adapted the code from a stack overflow answer, it works well for a few values but the order starts to get jumbled up so the date is not first. So most of the list(this is a nested list) is incorrect.

I was able to develop a loop which would shift the list to the next value if it was it was not a date:
while i < len(sibling_contents_clean):
    if regex_dates.search(sibling_contents_clean[i]):
        threelist2.append(sibling_contents_clean[i:i+4])
        print(f"correct, {sibling_contents_clean[i]}")

    else:
            print(f"incorrect, {sibling_contents_clean[i]}")
            lenoflist = len(threelist2)
            print(lenoflist)
            threelist2[lenoflist-1].append(sibling_contents_clean[i:i+1])
            threelist2.append(sibling_contents_clean[i+1:i+5])
            i += 1
i += 4
This was able to improve the list with more correct values.

But they were still more value to correct.
Before making the loop I had to use the python debugger to work out what was wrong. I decided to print values that stated if they were incorrect or correct using the if else regex statement which gave an idea of how much values I had to fix.

After that using the python debugger was able to run the program line by line. And worked out the value of the sibling_contents_clean[i] and the i variable.

By changing the I variable manually was able to work when the loop was going to print out an incorrect list of values. I learned to shift the list by one place I needed to +1 to the start and end of the list. For example sibling_contents_clean[i:i+4] prints out the number of i to 3 more places. If looked like I looked like this sibling_contents_clean[0:0+4] it will start to the first value to the third. After I was able to use the slice notation correctly to print out the stuff I want. But they are still issues.
Later I amended to else statement to elif statement. The condition for the elif statement if the value matches with any of the lift regex(squat, deadlift etc.) that will append to the previously made string. This was done as non-lift values were being appended to the back some of the list but they were not needed. The else statement to focus on mainly the non-lift and non-date values. The else statement simply separates the value to a single list. For example:

Now the while loop with the if statements looks like this:
while i < len(sibling_contents_clean):
    if regex_dates.search(sibling_contents_clean[i]):
        threelist2.append(sibling_contents_clean[i:i+4])
        print(f"correct, {sibling_contents_clean[i]}")

    elif master_regex.search(sibling_contents_clean[i]):
            print(f"incorrect, {sibling_contents_clean[i]}")
            lenoflist = len(threelist2)
            print(f' length of list: {lenoflist}')
            threelist2[lenoflist-1].append(sibling_contents_clean[i:i+1])
            threelist2.append(sibling_contents_clean[i+1:i+5])
            i += 1

    else:
        print(f"incorrect, non-lift, {sibling_contents_clean[i]}")
        threelist2.append(sibling_contents_clean[i:i+1])
        i += 1

    i += 4
The master regex is simply all the regex patterns of the lifts with added | between them. And also ?: attached to the capturing groups.
Trying to scrap my lifting Evernote page
This is my first coding project in a while. The main goal of this project to scrap the data from my Evernote and turn it into stats.

. As you can see on this image its mainly with a emojis to track my progress. As the note has a regularly structure it should not be too complex. So first we want to get a file to where we can use python to extract the information.

As the other image shows you there are many options to export a note from Evernote. The option went with was the single HTML page. Evernote has their own custom XML format called enex. This file format allows users to import notes back into Evernote. But trying to decipher this new markup language I thought will lead to extra work on my hands. Especially if I’m going to use tools to are not custom designed for it.

As this is a html file I’m dealing with I will using the standard web scraping tools mainly beautifulsoup. So decided to preview the html file. The results don’t look to bad. But a quick look at my text editor shows its not that simple.

As you can see the useful information of the note (Date and lifts) are clumped around one line. So scraping this will be not a lot more harder. This first thing I did was import beautifulSoup as this the library I will be using to extract the information from this file. Now to pass the file to the file to the BeautifulSoup parser function we will need to open with with python. Using this simple line file = open("Starting strength log.html", encoding="utf8").
Now we can pass this file to the parser like this soup = BeautifulSoup(file, "html.parser"). Now the beautifulsoup has the file parsed. We can now navigate and explore how we would scrape this file. print(soup.prettify()) will give us a good start as this prints the html as formatted Unicode sting with each tag on separate line making it easier to read.

From looking at the prettify results we can see that the useful bits of the note are within the body tag. And the content itself are within div tags down the hierarchy. Now we can use beautifulsoup to navigate this tree. I used the find() function to search within the body. soup.find("body")

Nice now the prompt prints information that its on the note. But the content is still a few levels down. As we will be using this section of the html tree can save the soup find as a variable. bodyhtml = soup.find("body"). Now we can use this variable navigate the different levels of the body tag.
As we can see the content we want are in other tags, mainly under the span tag. So we just simply just want state the tags we want to get under the parse tree. bodyhtml.div.span should do the trick.

Now we have zoomed in even more into the parse tree. We find that the other pieces of content are located on more lower levels. So, we need to explore the rest of the content on this level. Mainly this div level most of all the useful content a under a div tag of the same level. Scrolling down the prompt we can see the specific type of information we want.
Simply the date and the weights used on the lift. As the div tags are on the same level we want to navigate the parse tree sideways. We will attach the .next_sibling to the bodyhtml from earlier. So the command for the navigation would like this bodyhtml.div.span.div.next_sibling.

The prompt shows another div tag on the same level. But we want information further within note. Which are the dates and lifts. As they are on same level on the parse tree we could keep on attaching the .next_sibling commard but that is not practical due to the amount of siblings there are on the parse tree.
We can use the .next_siblings so we can iterate over the div tags in the parse tree. So we would make a loop to print the sibling. So it would look something like this
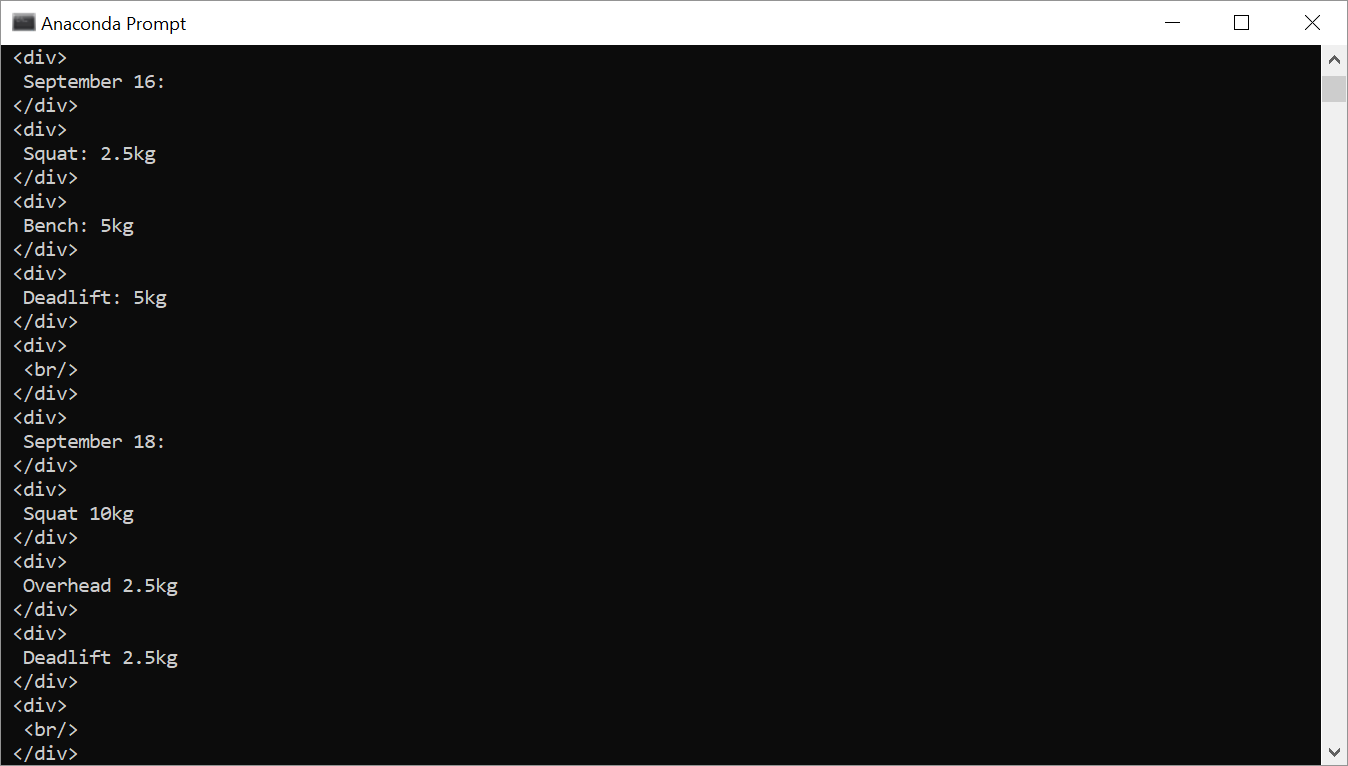
for sibling in bodyhtml.div.span.div.next_siblings: print(sibling)
It has successfully printed the other sibling in the parse tree. So now we found out a successful way to see the lifts and the numbers in the note. But its too clear as we need to get rid of the non-useful html code like “</br>” and the first section note before the lifts. And later use that turn data into a array and a file so it can be read for data analyse.
To be honest this where I’m stuck right now, so the next article should be describing how to solve this issue. Right now im able to turn into a list:

But unwanted items needs to be removed and elements must be turned into strings or numbers.
Django User registration
This week I was focusing on creating the user registration page for the website. This section took a while. As an unexpected bug occurred in the process. To start making the register page we have to copy some of the code from the base.html file. By copying the code blocks we get the repeatable code from the other pages like sidebar, navigation bar and style. Now we just have to fill it out with content. This is where the code for the form itself will be. first, we want to have a div tag to make the code more readable and assign it settings in the future. <div class="content-section"> will be name of the tag.
The next line we can add the form tag with the POST method. A POST method is simply data that is sent to the server. This is one of many methods used in the HTTPS protocol. Now, this we can to add something which is Django specific. We need to have a code block including a certain token {% csrf_token %} which stands for Cross Site Request Forgery protection which protects the page attacks where a malicious site has a link, form button or javascript. which is used for a certain action on your website. Uses the credentials of the login in person. After adding that code block to the form we define the fieldsets. We define the fieldset class as from-group <fieldset class="form-group"> And we can big text on top of the form like join today <legend class="border-bottom mb-4">Join Today</legend> If the user does not have account. Then we add the code block form {{ form }} One of the good things about Django is that reduce the need for boilerplate code helps the developer focus on uniques solutions to the project on hand. After this we can make another div tag with the name form-group <div class="form-group">. Under this tag, we can contain the button.
This will be the sign-up button so the user submits the details of the form to the server. For the button, we can add some bootstrap code to it. button class="btn btn-outline-info" is a button bootstrap class. This simply crates button in an outline. type="submit" simply submits the info as this is a form. After that we can add text under form for extra infomation. Here we just have a sign in link if the user allready has an acount.
<div class="border-top pt-3">
<small class="text-muted">
Already Have An ancount? <a class="ml-2" href="#">Sign in</a>
</small>
The small tag will simply just make the text one size smaller than the HTML document. We also add a dew bootstrap classes to these tags. The link for the sign in page has a pound sign (#) which makes it a dead link. As we do not yet have a sign in page. Now we have the view for the resginster page we can set the logic for the form. We can set up a new file called forms.py where we can create the fields for the forms. Django has lots of a avabible code to use for this so we can simply import them to the file.
More Django
Today I've been learning about Django. This time I learned more about how to use templates within Django and stepping the admin page with a database. Most of the time was spent setting up the templates. The video did help explain how to use them but also the convention when using them.
At the beginning of the tutorial, I was adding most of the HTML on the individual pages with most of HTML is the same. The person in the video explains you should have a base HTML file where most HTML of the other pages can inherit from. This is so you have extra work to do if you want to change HTML where many pages share the same piece of code.
In the tutorial to make the pages more prettier we around a few pieces of code from the bootstrap website. The piece of code from the bootstrap website has CSS, HTML and some javascript. The chuck of code adds some colours and changes the font to look cleaner. Shortly in the tutorial we copy and paste snippets from the person GitHub account to add features like navigation bar and spacing between content and aside to make the website even more appealing. After adding most of the code snippets. I had to change the links for the navigation bar and other parts of the base HTML file.
After doing that, I moved to the next video which about the admin page. When starting a new Django project using the django-admin startproject mysite command. This will create a directory of all of the files and folders that are needed to develop the website. When running the server for the first time you can navigate to the admin page using /admin next to the web address. This won't work the first time as they are no accounts to log in into. But after you first set up a good amount of the public side of the website you could start to set up the admin system. As Django comes with an admin system with the HTML and CSS on the page. The developer mainly needs to focus on creating staff accounts and managing the database for this. This is great as making a separate admin page by starch will be tedious. So Django automates most of the tasks. Using this command python manage.py createsuperuser. Will make you set up a user for the admin page so you can log in. Django will prompt you for username, password and email address. If your making test site like I was you could use a make email address as is not important to log in as the page will only require the username and password. After making the account, you need to run the development server to so you can go to the admin page on your browser. Now you on the page you can log in using the information you used to make the user. Now you should see a page with the options with users and groups.
Second part
I stopped at setting up the admin page. Now carrying on from that. We need to create a database for the website. The database will later connect to the admin page again later. The database will already be set up from the startproject command which made all of the files and folders for the project. Django uses SQLite by default. As they are no extra installation needed for SQLite. As it comes with the python standard library. The next thing we need to do is define models. This is a very important bit if you want to deal with databases with Django.
A model is a way of defining your data in an object-oriented way. Defining models is done in the models.py file under your app's folder. To make a model you need to make a class with the name of your model. Then in the parenthesis add models. Model. Under that define the variables used in that model. For example, the Django documentation has an example of making a poll app. The model will be a question which will have a question_text variable which is defined with CharField with the max length of the character 200. And the publication data variable which is defined with a DateTimeField with a string next to saying data published.
This model should look like this:
class Question(models.Model):
    question_text = models.CharField(max_length=200)
    pub_date = models.DateTimeField('date published')
Now with this, the model code can give Django lots of information to work with. Django can make a database schema from it using create table statements and other SQL commands. And a python database API to access the question and choice objects Now we need to connect the polls app to the Django project.
One of the great things about Django is that apps are plug and play meaning you can have apps can be used for multiple projects. Making lots of Django easy to reuse and creating more resources for future projects to do more repeatable work. Under the settings.py under the project folder, there should be a list in the code of the installed apps. It should look like this:
INSTALLED_APPS = [
    'polls.apps.PollsConfig',
    'django.contrib.admin',
    'django.contrib.auth',
    'django.contrib.contenttypes',
    'django.contrib.sessions',
    'django.contrib.messages',
    'django.contrib.staticfiles',
]
You will need to add the path of your app. Because you're not copying a direct path like Django_tutorial\first_site\first_site\settings.py You will need to add a type of reference to the configuration class when adding it to the list. The Config class will be in the yourapp/apps.py file so to make the dotted path is yourapp.apps.pollsConfig. Now Django should know about the app you just coded up. Now you need to run this command:python manage.py makemigrations yourapp
After running this you should see something like this:
Migrations for 'polls':
polls/migrations/0001_initial.py:
- Create model Choice
- Create model Question
- Add field question to choice
By running this command makemigrations you simply telling Django you made changes to your models. Migrations are how Django saves changes of the models. This should create a file called 0001_initial.py under the migrations folder. They are not normally expected to readed often but they designed so you can edit them.