Learning Django
Today I starting learning the web development framework called Django. This is something I wanted to learn for a long time after dipping my toes with flask a while back. I've heard good things about Django as many people have made their websites using this framework. Big companies like Instagram used Django to help them set up their website and still use Django and python to this day. One of the benefits I heard about Django is that Django is full of more features making it the go-to package if you want to make a web project that can be used for bigger amounts of traffic and making the web project more fleshed out. Flask is known for being a lightweight library. And mainly used for small projects. I've mainly used the flask to make a minimal web interface when I was doing my machine learning projects.
To start learning Django I decided to watch the tutorial series by Corey Schafer which is a youtuber I think I recommended in a previous article. As he is a very great teacher as he can explain hard concepts simply. His youtube channel has a good back for lots of python related topics and general programming topics. I had the set up as follows: having the youtube page on the left side of the computer by turning the browser window to half size. The window on my right was the text editor atom. And I have the command prompt (anaconda) normal size and unanchored.
The first step to Django was to install the library itself. First, I simply made a new conda environment for web development do if I want to install any other library relating to web development (Like flask) I have will dedicated environment to it. Making a new conda environment does not take to long. Simply use this command: conda create --name [insert name environment here] then the command prompt will ask you to proceed by showing this: proceed ([y]/n)? and you simply enter the letter y to make the environment. If you want to know more about conda environments check this link: https://conda.io/projects/conda/en/latest/user-guide/tasks/manage-environments.html#creating-an-environment-with-commands
After the environment is set up you simply use the pip command to install the library. Using this command should install the library via pip. pip install Django. To verify the install worked to use this python -m django --version. This should return the version of Django.
Now to start you need Django to auto-generate some code of you. Make sure your command prompt is in the directory where you want to write your code. Then run this command: django-admin startproject [insert name here] this generate the code that the site will use. The folder crate should look like something like this
mysite/
manage.py
mysite/
__init__.py
settings.py
urls.py
wsgi.py
Now to see if the website is correctly generated you need to run this command: python manage.py runserver. Your command prompt should print you something like this:
Performing system checks...
System check identified no issues (0 silenced).
You have unapplied migrations; your app may not work properly until they are applied.
Run 'python manage.py migrate' to apply them.
January 11, 2019 - 15:50:53
Django version 2.1, using settings 'mysite.settings'
Starting development server at http://127.0.0.1:8000/
Quit the server with CONTROL-C.
This is a lightweight web server used for development and debugging the website you made. When you open the IP address in your browser you should get a Congratulations on the web page should the loading of the web page was successful. From here you can start to customise your website.
I will write more about this project in the next post.
SQLite for python
My main project for the day is to make a mini-SQLite project. SQLite is simply a lightweight version of a SQL database. The database is created on the disk of the computer. Compared to spinning up a whole server and worrying about configuration. SQLite can be used a small to medium sized program where a whole SQL server is not needed. The advantage of SQLite that it can be ported to a whole SQL server if needed. So SQLite can be used for prototyping SQL servers.
The tutorial I used was from Corey Schafer a youtuber that makes the many informative videos about python and coding in general. I will highly recommend you watch his videos and subscribe to him if you don't already do so. I will note that I haven't finished the project or the tutorial so I will be doing that later next week.
To start the program you need to import your libraries as you would do in any other program. The SQLite import name is called sqlite3. It is part of the python standard library so you don't need to do any pip installations. This makes with dealing the library much easier as your like likely to have installation headaches like trying to find the link for the library making sure the library suit requirements, or making sure the WHL file is correct for the PC. (This is something you may have dealt with if you're trying to learn about machine learning. Cough, cough tensorflow)
After typing the import statement then you need to make a command to connect the program to a database. conn = sqlite3.connect('Insert path here') Should do the job. The brackets are where you will simply give the name of the database as a string form. If the program does not have the database named in the connect statement. the library will make the database for you. So each time you run this statement for the first time the program should create the database for you. After that, you need a way to sure SQL commands. To navigate the database. The next line will include c = conn.cursor() which will make it possible to run SQL commands using the execute function.
c.execute("""CREATE TABLE employees(
first text,
last text,
pay integer) """)
Should make the SQL table for the employees. Using the doc strings will allow us to make commands will multiple lines without any line break. Other people have other ways to make multiple lines commands and statements but this is the one we are sticking to right now. Inside the doc strings and brackets, you can see the SQL code that is used. After typing up your SQL commands you can not run it from there.
You next need to use the commit function will send to SQL statements you have typed up to the database. Think of this command like the git commit command. Running those commands should send all of the statement to the database and return no errors. The line after should have the conn.close command to close the connection between the database. This is simply a good habit to get into.
Starting my mini SQL project
I've been making a mini-project for myself to practice my SQL skills. The project was a simple Online retail application database. I thought I will do something it had a lot of relevant.
In the beginning, I was thought to do a railway database system but when I googled some tutorials or examples I did not get much-satisfied results for the project. I found plenty of example code of making an online store database. So I decided to choose to pick this project.
The design of the database was based on this blog post here. The blog post gave a great rundown on how to design an online store backend. The main issue I had is that I have been practising SQL since the tutorial so I struggled to remember the commands used to make tables and making the rest of the database. I simply googled the reference for SQL commands which gave me a good refresher on the commands I want to use. I first created a table with the item or products. The table had one column of the id of the item which I set up as the primary key. The second column was the name of the product. Also, I made a purchase table which contains the purchases of customers. With the columns with the first on being an id again and the customer account id. I made the first column containing the if as a primary key.
This is the bit have done. So I should first the rest of the project later on. Next, I would have moved on to making a customer table in which the first column would have been id set as a primary key and three other columns which include name email and password. This will do most of the work of making the online store backend.
One issue is that just having a purchase table is that it gives a limit to the database on how much purchases can be completed. This is solved by making an intermediate table connecting to table which allow for making unlimited purchases on the database. The table can be called purchase item which is connected to the purchase and item tables. With 4 columns purchase id, product id, number of items, total price. with purchase id and product id as the primary and foreign key to helping connect to the other tables. less important columns can be added like the number of times purchased, total price. and so on.
The blog post basically gave me a step by step plan on how to design to the database so it's highly recommended that you check it out. The blog post does not give lines of code to copy and paste to the database. But the pictures and explanation make it clear what you need to do. So just checking up the commands will get you covered.
What I learned from SQL
I've been trying to learn how to use the programming tool SQL. I first tried to install PostgreSQL but from installing it the options looked confusing, but I went ahead anyway.
But when I tried to use the shell I was stuck on even starting to create a table. First, I thought could PowerShell as I saw in the tutorial. and just type SQL to access to the SQL shell. But I quickly found out it did not work. I wasn't sure about how to access the shell or use the program. so I downloaded another PostgreSQL program from another provider but I still had the same issue. So I switched tutorials.
With the new tutorial, I was viewing it used a MySQL program for the tasks. So I went on to install the program. The person in the video did a good job explaining the options of the installation so I had a better understand what to do compared to the PostgreSQL programs. After installed the program opened up the shell I thought I was supposed to use. But I quickly found out it was a different shell with extra features. as did look slightly different from the tutorial. I found the shell I was supposed to use and entered my first SQL line of code. All this fiddling around with these programs took around a day so needless to say I was pretty happy after using a working edition.
Now the tutorial prompted me to install another program to use SQL by. As the shell lacks visuals making learning more difficult. The program I installed was popSQL a minimalist style text editor for SQL which has some cool features like google docs style collaborations on files. but as I'm not using SQL for anyone else right now. I wouldn't be using that feature.
Now the tutorial starts with us making an example table to use. The table was a simple student, major and name. After clearing the commands to make the table. We moved on the other basic commands of manipulating the table. From my first experience of the SQL language is that is very simple once you know the main keywords like SELECT or WHERE or FROM. As normally use pandas manipulating data like this can be a bit longer compared to SQL.
But the SQL language was designed from the ground up to interact with databases and deal with manipulating data in general. As the SQL is not a fully fledged out programming language like python or javascript. As it lacks loops and control flows which the other languages have. To be honest I can't imagine a person creating a program from scratch as it lacks these features. But like mentioned earlier SQL was designed to mainly interface databases. so the language really just has one main goal. The languages which I mentioned earlier tend to be general purpose so you can use them for a whole variety of tasks. From AI to web development these languages cover the whole breadth of activities and tasks they can do.
Web scrapers and being stuck
I’ve recently been making a project due to my Upwork requests. The first project was a Facebook web scraper t thought it will be pretty easy. But I found out I had to have a facebook account and it when all downhill from there. The goal was to design an web scraper that takes the name of people from a facebook group then copy the name to search them on LinkedIn and save the URL if the person has a LinkedIn profile. So I imported my libraries and set up selenium to log in to Facebook after I made a whole need google account to I can use a new email address. After I when to work so the idea was to use selenium to grab the element and extract the text. But I hit a problem as i could not select using XPath or class. Which I had a similar issue with my Bloomberg project as I could not grab the element for the accept button. Because i was struggling to use selenium to get the job done i decided to switch to beautifulsoup but I instantly hit a wall as i need a way to log in. As I noticed the request library got fetching the login in screen. So I worked out that I can use selenium to log in as it required javascript. But a little use is that i confused how selenium will get the HTML as I still kept it on requests. But using the driver.page_source was able to transfer the HTML to the page to beautifulsoup so I thought I was in the clear but I still coundt find a way the select the element i noticed the code that beautifulsoup needed was there as I was using the search function on the anaconda prompt. But I spent a few hours on this issue. the main problem I noticed was the navigation of the HTML to find the element as the names of the classes and ids tend to be a random assortment of numbers and letters. so to was a maze trying to get selenium or beautifulsoup to select the element. Because I was getting not progress with this project I decided to move on to another project. Which the task was to make a web scraper that gets the information of the homepage of the items for sale. Also Similar to I project I did for myself. I started this project the next day as I was drained from the previous project. So I decided to start with beautifulsoup this time but I noticed I could get some of the information so i decided to bring in some selenium so I can navigate the javascript. With selenium, i handed over the HTML for the rest of the scraping with this I noticed that the class and id naming scheme made for sense so I could navigate more easily. But the more I tried to code I noticed I was forgetting the commands and the functions of the library so I had to reread on how to use beautifulsoup and watched the same videos for my first beautifulsoup project to get up to speed.
Selenium Screenshots
In a recent project, I had the task to take screenshots of websites using the automation tool selenium. To do this I had to do the normal set up of starting the webdriver of your browser your choice. im using firefox so my code reads as driver = webdriver.Firefox(). Next, we can navigate to the website you want. My chosen website was Bloomberg Europe as I want a website with clear sections I can navigate to. But this is the point I got stuck as when you log in to a website in Europe you are greeted with a prompt ask your permission to use your personal data. This is because of GDPR. I thought it will be an easy solution as I will just get the element containing the accept button then move on. So first I just copied the Xpath of the element saved a variable I called GDPR button to driver.find_element_by_xpath() but the script was repeatedly saying the XPath cant be found. So decided to use the class name instead but did not work. So I decided to move on and code up the rest of the code as I could not think of the solution. The screenshot code did not take that much-thinking power as did the GDPR prompt. I first used the command find_elements_by_class_name and used the section headline element in the parenthesis. The next line was driver.save_screenshot(‘sample_screenshot_1.png’) which directs selenium to take a screenshot and the next line was a simple print command saying “Screen saved” for a good may of tracking if the program successfully took a screenshot. The next lines the code repeated two more times with different numbering for the screenshot name. I will come back to this project as the screenshots only able to show the GDPR prompt. So finding a way to fix this will likely solve most of the task.
How to make a UK holiday calendar in pandas
Do you want to make custom holiday calendar with pandas?
By default, you can import pandas US Federal Holidays by using this command from pandas.tseries.holiday import USFederalHoildayCalendar but if you live outside of the US you need to make your own type of calendar class. Which is probably why you are checking out this blog post.
If you are using these calendars in a business setting you may want to calculate business days. To work out how long a project may go on for. Or working out an employee’s working days. Etc. You see below how pandas business days are used using the holiday calendar.
Holiday Calendar Class
A Holiday Calendar class is made up of rules where you will define the dates of the holidays. For fixed dates like Christmas and New year’s an observance rule used to determine where the holiday falls.
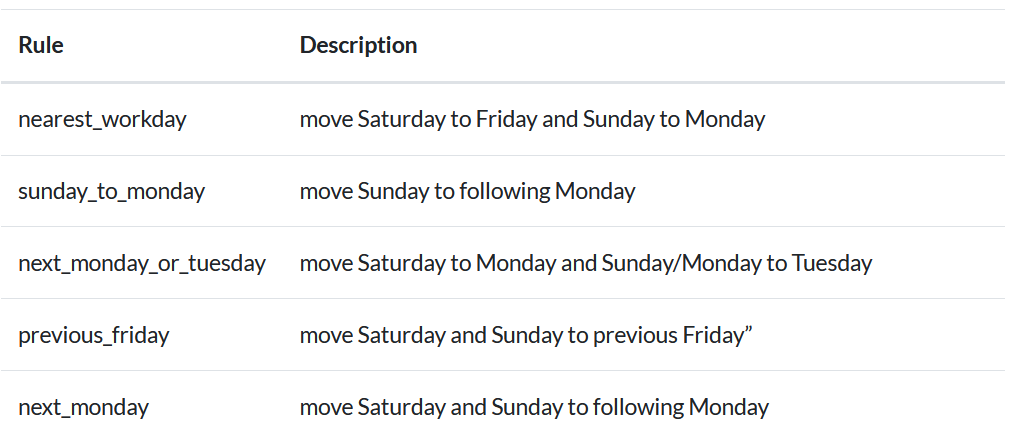
For non-fixed days, which is the majority of UK holidays. You will need to use a DateOffset function. A DateOffset object increments the time of your chosen date. While keeping in calendar rules, unlike timedelta. Calendar rule like starting a new day at midnight. Or moving the date by business days.
UK Holiday Calendar Code
The code is from this website. (The page is archived as a live version is not available. If it is, please message me.)
I will explain an example to see how a holiday is made.
Holiday(‘Early May Bank Holiday’, month=5, day=1, offset=DateOffset(weekday=MO(1)))Month=5 defines the month of May. And day=1 defines the first day. The offset variable using the DateOffset object mentioned earlier. weekday=MO(1) defines the first Monday. As MO is shorthand for Monday. This is used in the context of setting up the Early May Bank Holiday as this holiday falls on the first Monday in May.
Weekday instances are explained below:
weekday:
One of the weekday instances (MO, TU, etc) available in the relativedelta module. These instances may receive a parameter N, specifying the Nth weekday, which could be positive or negative (like MO(+1) or MO(-2)). Not specifying it is the same as specifying +1. You can also use an integer, where 0=MO. This argument is always relative e.g. if the calculated date is already Monday, using MO(1) or MO(-1) won’t change the day. To effectively make it absolute, use it in combination with the day argument (e.g. day=1, MO(1) for first Monday of the month).
— https://dateutil.readthedocs.io/en/latest/relativedelta.html#dateutil.relativedelta.relativedelta
Another example of one of the rules added to the class:
Holiday(‘Christmas Day’, month=12, day=25, observance=next_monday),Observance variable is used as Christmas is on a fixed date. In tradition, if Christmas day falls on a Sunday or Saturday the following Monday is set up as a bank holiday.
If you will like find sources on how holidays are picked, then check the links below:
https://en.wikipedia.org/wiki/Bank_holiday
https://www.timeanddate.com/holidays/uk/?hol=1
Business days
Now after creating the holiday calendar from above you can calculate business days. To do so you will need to create a custom business day. This is done by using the CDay dateOffeset function:
custom_buiness_days = CDay(calendar=Hoildays_England_and_Wales())
After that you now multiple dates using the calendar from above.
from datetime import date
from pandas.tseries.offsets import CDay, Week

print(date.today())
>>> 2020-06-18
One_week_later = date.today() + Week()
print(One_week_later)
>>> 2020-06-25 00:00:00

Three_buisness_days_later = date.today() + (custom_buiness_days * 3)
print(Three_buisness_days_later)
>>> 2020-06-23 00:00:00
If you want to pick a specific date or time, you can use pandas datetime or timestamp.
certain_date = datetime(2020, 4, 25, 10, 0)
One_month_later = certain_date + MonthEnd() + Day()
print(One_month_later)
>>> 2020-05-01 10:00:00


tz_bus_day = pd.offsets.CustomBusinessDay(calendar=Hoildays_England_and_Wales())
ts = pd.Timestamp('2016-10-30 00:00:00', tz='Europe/Helsinki')
two_business_days = 2 * pd.offsets.CustomBusinessDay()
print(two_business_days.apply(ts))
>>> 2016-11-01 00:00:00+02:00
Read more dateOffsets and ranges to use check the pandas docs.
Conclusion
Now you know the basics of using creating custom calendars and business dates. Feel free to use the code examples above and share any examples of you using this code for your projects.
What AI can learn from AI in video games?
I was asked this question when watching a youtube video of the same title by the youtube creator Mark Brown. I urge you to watch the video as this article will be mostly based on that video. The first point he makes is that good ai allow the player to cheat. He gives examples like in Skyrim the player can put a bucket on top of a shopkeepers head and rob them. or in farcry that only a few enemies are allowed to shoot at once.The second says good ai tell you what it’s thinking, I believe this is an important statement for machine learning as right now we lack the AI(ai in the normal sense, not the video game) can’t tell you what’s its thinking but solves the problem at hand perfectly. This is what many experts call the black box problem. In the video, mark gave the example of barks where NPCs give short vocal clips to give the idea to the player that the user what the ai is about to do. When doing machine learning obviously you won’t have the model gove you vocal clips, but it will be nice to find a way for the model to give a prompt where it’s heading to solve a problem, I know for evolution models the most fitness model will be more likely to spread its features so the user can have some idea where the model is going to solve the problem. Next in the video mark said what makes a good ai in a video game is predictableness, the reason for this is because when playing the ai should be consistent so the player can develop plans against the ai which allow the player to play the video game with intentionality. In machine learning, you want the same for the model you are training it’s no good to have an unstable loss chart as that means the model is still mostly winging it. Or having a high prediction rate as the results given will be consistently right with some errors. The next point in the video he says good ai can interact with the game system. In the video they gave an example of in Zelda breath of the wild, enemies set their clubs on fire, kick bombs away and even throw other enemies at the link. In machine learning, they are many examples of this. In another video from two-minute papers which gave 4 examples of the ai worked unexpected ways in the environment. In one example it showed a spider-like robot to walk using none of its legs, the robot prompted to flip upside down and use its elbows to move. The difference between the machine learning example and the video game example is that the video game example the ai is purposely scripted to complete those actions but giving the illusion to the player that the video game ai is smart. The machine learning example the authors were generally surprised as those events are not scripted in.
Formatting column names with pandas
For a task, I needed to do was to add speech marks around values in a CSV file. for example “http://example.com/", “0” . When finished the task it only took around 20 lines of code. But taking lots of googling around to complete this simple task. The first solution I thought of was to add two speech mark string at the beginning and end of the columns. like this, df["url"] = ”’” + df.loc[:,["url"]] + "'"
It was able to work for one of the columns. I wasn’t sure why it did not work for the second column, As I printed the column as normal it successfully worked. First, I found out that the name of the second column had whitespace when checking the CSV file. I printed the column names as a list using this command: list(my_data.columns.values)to see the error in pandas and making and before and after. When making a variable for the pandas series after striping the column.
After the prompt stating printing an error that said it can’t concatenate strings with an int, I quickly learned that the second column needed to be a string. Even though the second column mainly contained numbers I just assumed it will be a string. After I added this function df["score"] = df["score"].apply(str)to change the series into a string data type next. after I tried concatenating the speech marks strings together with the pandas series, this time it worked.
Next, the pandas series need to be stitched together. To do this you can use the conat() function and maybe print df.head()or df.tail()to preview the dataframe. Now the dataframe is ready to export so next use the to_csv()function. Something I found out when doing this, Is when to CSV file was made pandas gave the values extra quotes, for example, the values in the CSV looked like this
“””www.example.com""" “””0"””To fix this you have to import the CSV module and set quoting = csv.QUOTE_NONE in the to_csv() function.
Web Scraping laptops prices with BeautifulSoup
Recently I’ve been learning a new technology which is BeautifulSoup. A python module used for web scraping. So over the past days doing some tutorials and watching videos about web-scraping. I decided to choose BeautifulSoup it was the most used module used for the tutorials and videos that I saw. The first main tutorial I did was from the website realpython which gave a pretty good overview of web-scaping and also the requests library. In that tutorial, I had to scrape Wikipedia’s XTools to found out the most popular mathematicians on Wikipedia. A very odd project idea, I know. But was effective for getting me to the basics of the libraries. As had knowledge of HTML, it helped speed up the process of learning.
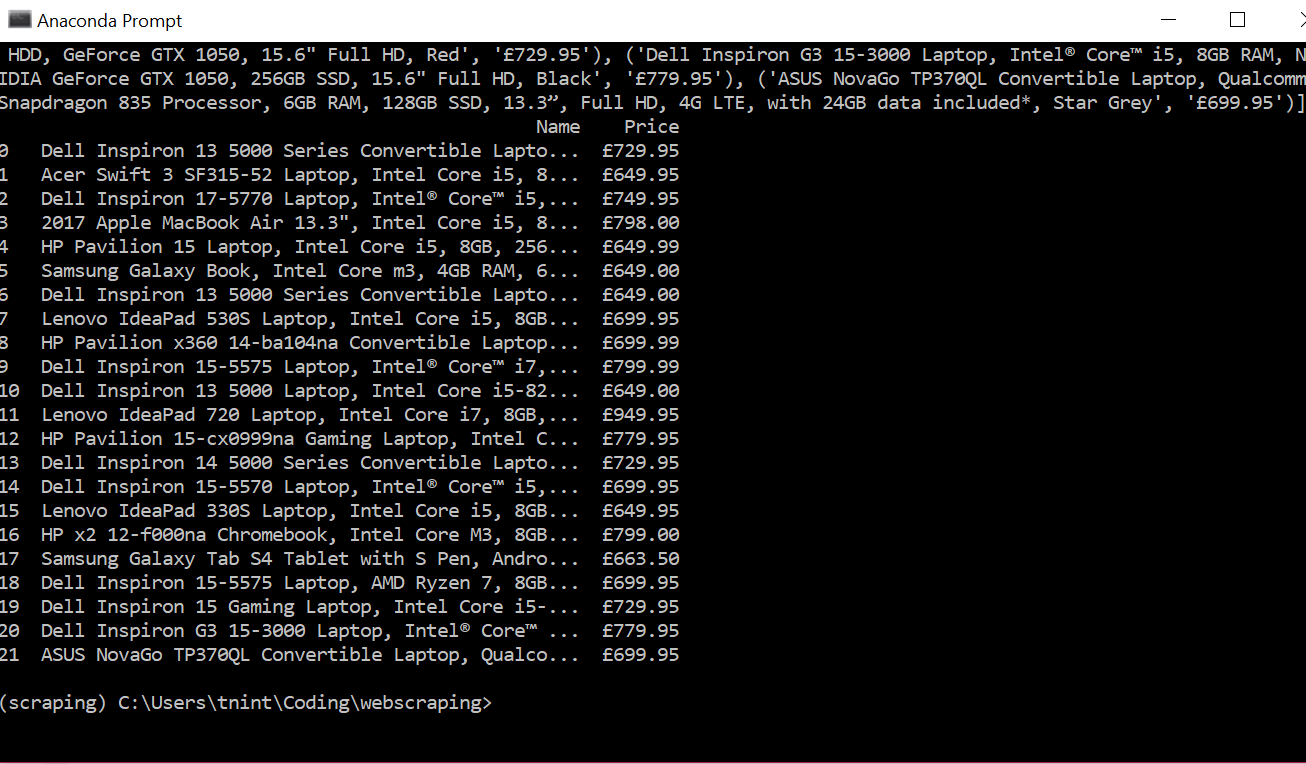
To test my skills decided to make a mini-project for myself where scrape prices for laptops. The reason why for this project I’m looking for new laptops so this project will prove helpful for my research. To start decided to used a different tutorial for my code from hackernoon.
from bs4 import BeautifulSoupimport requestsimport pandas as pdpage_link = "https://www.johnlewis.com/browse/electricals/laptops-macbooks/view-all-laptops-macbooks/price=600-800/_/N-a8fZ6lq8?showInStockOnly=false&sortBy=rating"#fetch content from urlpage_response = requests.get(page_link, timeout=5)# parse htmlpage_content = BeautifulSoup(page_response.content, "html.parser")The code was short and simple but unlike the code from the realpython tutorial did not have functions did catch errors from requests or use the functions to make the program more abstract but still readable. The goal of the solution is to extract the name of the laptop and the price, A very simple goal. Using the code from the hackernoon tutorial I noticed when printing the statements that it only printed HTML not the just the text. To fix this found another tutorial on youtube with showed to extract text from an HTML element. Sometimes the beautifulsoup functions are similar but do slightly different things, For example, find()vs find_all()the first only find one instance of the HTML element the second finds all as a list. After that using a for loop with the find_all() function helps extract the text of the laptop names and prices. I printed the text and appended them as a tuple to a list called records. Next using the pandas library I converted the list to a data frame which I then exported to an exported to a CSV for later use.
The project did not take to long and the code only ran up to 28 lines which surprised me. I think to show how much the requests and beautifulsoup libraries abstracted most of the complicated work away. Also helps I only extracted one page. In future projects may use something like selenium for non-static websites or use it to navigate multipage.